Customer Issues |
|

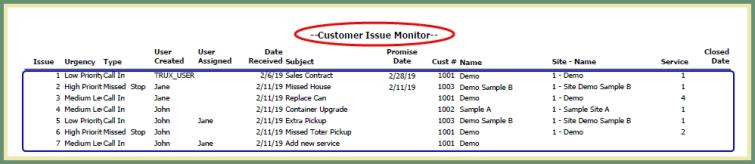
Customer Issues is available from multiple locations throughout TRUX to Create and Modify issues which record customer requests or complaints and allow you to record comments and images against the issue to track the history of the issue. The Customer Issue Monitor displays existing issues and can be filtered by specified Parameters. Customer Issues can be defied by your company specified Issue Types and Urgency Levels. Existing issues can be reported on the Customer Issue Listing. Also See Related Tasks.
Preceding Requirements
Prior to adding customer issues, the code tables for Customer Issue Types and Customer Issue Urgencies need to be populated.
Navigate To: System>Configuration>Code Maintenance>Customer Issues>Customer Issue Types
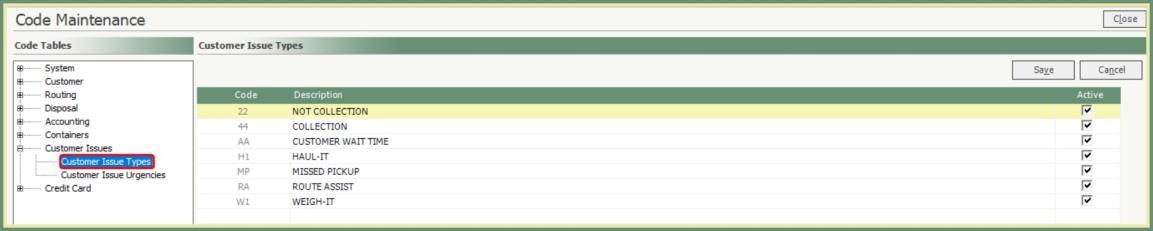
- Add a code and description in the Customer Issue Types table.
- Save.
Navigate To: System>Configuration>Code Maintenance>Customer Issues>Customer Issue Urgencies
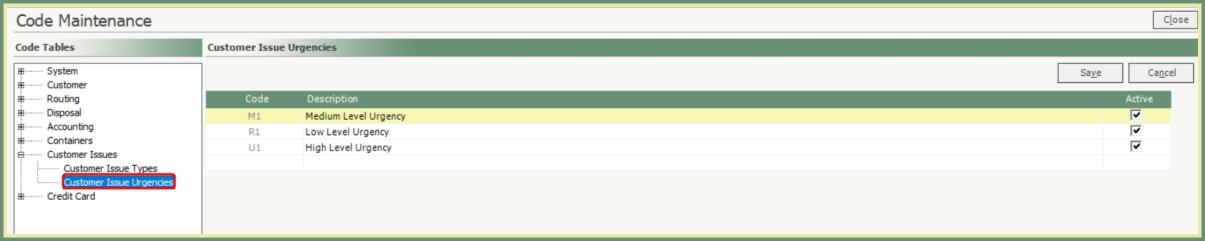
- Add a code and description in the Customer Issue Urgencies table.
- Save.
Customer Issues can also be added and viewed from the following locations throughout TRUX:
- Customer Service>Customer Issue Monitor
- Customer Service>Add Customer Issue
- Homepage>Customer Issue Link
- Search Results>Right Click>Create A New Customer Issue
- Customer Explorer>Customer/Site/Service Level>Issues Tab>Create Customer Issue
- Services To Be Routed>Right Click>Add or View Customer Issue
- Dispatch>Unassigned or Assigned Call>Right Click>Add or View Customer Issue
- Route Center>Unscheduled/Scheduled/Completed Call>Right Click>Add or View Customer Issue
- Route Center>Route Completion>Closed Customer Issues (For calls scheduled during Create Customer Issue)
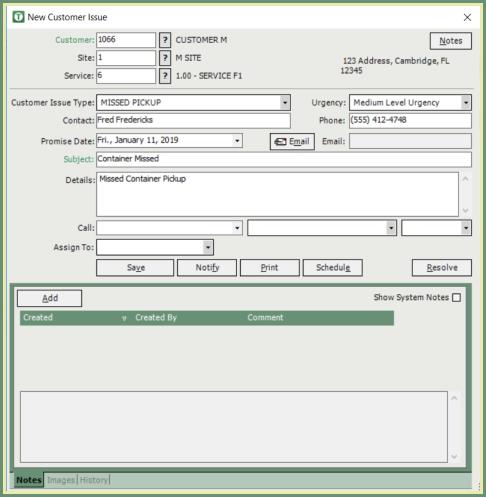
- Add or search and select Customer/Site/Service.
- Select Customer Issue Type.
- Select Urgency.
- Select Promise Date (optional).
- Enter Subject.
- Enter Details.
- Save.
Once the Customer Issue has been saved, the issue can be scheduled as a call, added images & comments, printed, etc...
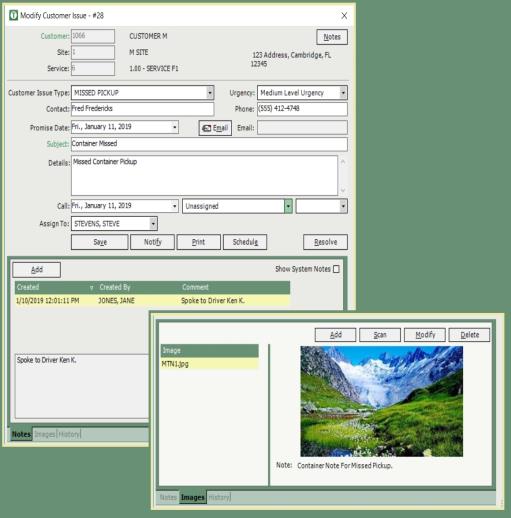
- Assign To: Assign the issue to an existing user.
- Notify: Email the issue to existing users.
- Print: Print the issue.
- Schedule: Call will be scheduled. Call date, route and sequence will be populated once assigned.
- Resolve: Resolves the issue.
- Notes: Add notes on this issue.
- Show System Notes: Displays System Notes when Show Sytem Notes is selected.
- Images: Add/Modify/View images associated with this issue.
- History: Created, Modified, Resolved date/time/user and Emails associated with this issue.
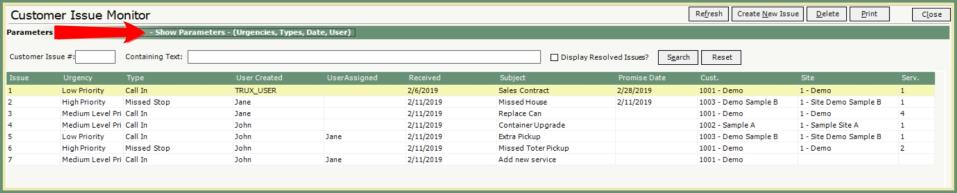
Navigate To: Customer Service>Customer Issue Monitor

The Issue grid will populate with Customer Issues based on the current Parameter setting.
- To view a specific Customer Issue, enter the number into Customer Issue # and press enter.
- To view a Customer Issue based on specific text, enter the text content in the Containing Text field and press enter or click Search.
- Click Reset to Clear.
- To include Resolved Issues in the grid, click Display Resolved Issues box.
- To sort the grid by any column content, click on the column header. Click again to reverse the sort order.
- Double click on an issue to open the Customer Issue.
- To add a new issue, click Create New Issue.
- Click Refresh to refresh the grid with new and updated issues.
- To remove a customer issue, click Delete. Verify Delete message.
- To print the Customer Issue Monitor grid content, click Print

 .
.
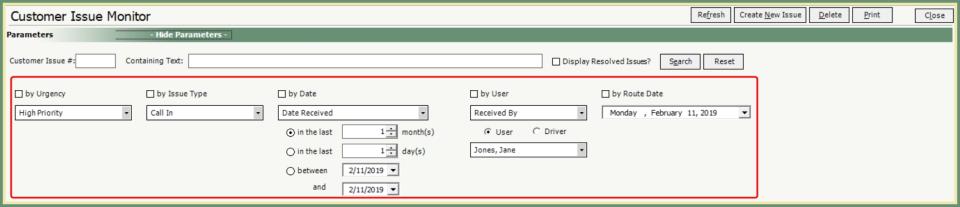
The current grid Parameter settings will be hidden.
- To modify the Parameter filters, click the top banner - Show Parameters -.
- Click Hide Parameters to remove the Parameter filter display.
- Select the box for each Parameter setting to be filtered by.
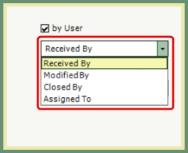
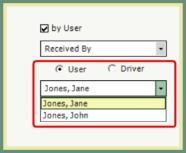
- Urgency, Issue Type, Date, User, Route Date.
- Select the filter from the drop down.
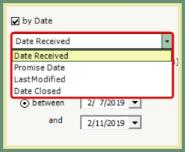
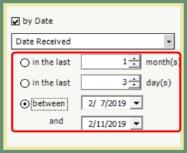
- Select Date filter: In the last _ month(s), In the last _ day(s), between mm/dd/yyyy and mm/dd/yyyy .
- By Date: Select the Date field to be filtered.
- By User: Select User field to be filtered by.
- User or Driver: Select User name or Driver name. The drop down will populate with names associated with the User or Driver type selected.
- To apply the Parameter filters, click close and re-open Customer Issue Monitor.
- These Parameters will be retained until changed.
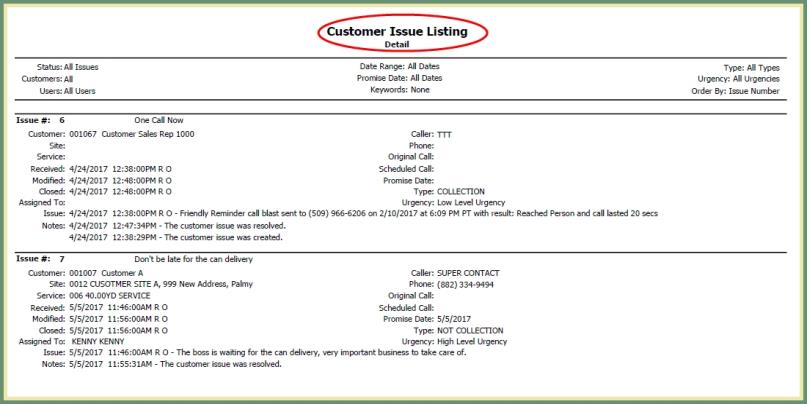
Navigate To: Reports> Report Center>Customer>Customer Issue Listing
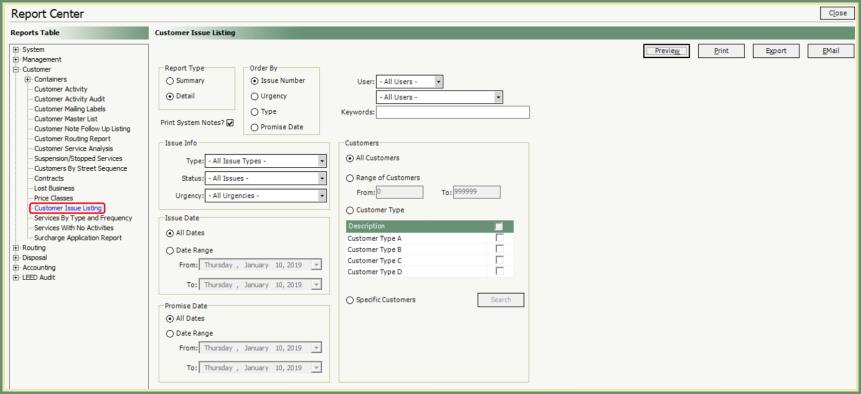
Select Report Parameters:
- Report Type will default to Summary. Print System Notes can be included on Detail.
- Order By selection will sort the report listing by the selected Order By issue category.
- All Issues, Dates, Users and Customers will be included as the default unless specified otherwise.
- Select Report Output.