Generate Invoices |
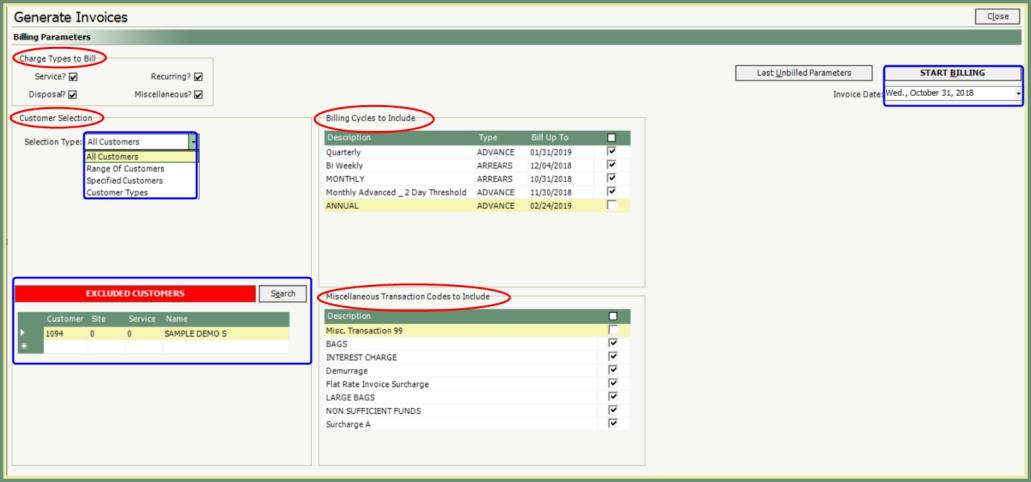
The Generate Invoices program is used to bill customer accounts for the services you have provided. The Billing Parameters allow you to bill customer accounts by customer selection , customer type, billing cycle and miscellaneous transaction. You can select charges by each type to be included or excluded.
Surcharges and Taxes are calculated automatically, based on the parameters you define in the billing parameters as well as the customer account. Recurring charges are automatically prorated for partial periods, both proactive and retroactive price adjustments are handled automatically and service termination credits are also processed when indicated. Also see Preceding Recommendations and Related Topics.
Prior to Generate Invoices, it is strongly suggested that you Generate Interest Charges , Generate Demurrage Charges and Calculate Unbilled Revenue to review all charges prior to billing.
- In order to include Interest Charges on the next customer invoices, Generate Interest Charges must be run prior to Generate Invoices.
- In order to include Demurrage Charges on the next customer invoices, Generate Demurrage Charges must be run prior to Generate Invoices.
- Review unbilled charges prior to billing. Calculate Unbilled Revenue allows you to generate a mock billing for review; providing the opportunity to make changes or corrections prior to Generating Invoices.
Navigate To: Accounting>Billing>Generate Invoices

All Charge Types, Customers, Billing Cycles and Miscellaneous Transactions will be included in the Billing unless specified otherwise. A description of each Billing Parameter type is described below.
Charge Types to Bill allows you to Include All or Specify Charge Types to Include and Exclude.
- Service: All scheduled and completed service charge activities.
- Disposal: All disposal tickets.
- Miscellaneous: All miscellaneous transactions entered; including Surcharges, Interest and Demurrage.
- Recurring: All Period Charges. Activities billed for a period of time (Monthly, Quarterly, Annual, etc...) based on the Start Billing Date and Effective Date of the recurring activity on the customer service.
Selection Type allows you to Include All or Specify Customers to Include and Exclude.
- All Customers: All customers and sites will be Included by default unless changed.
- Customers and Sites can be excluded in the Excluded Customers section.
- To Exclude Customers, enter the Customer or Customer and Site numbers manually into the Excluded Customers grid or use the Search button to search and select.
- Range of Customers: Select customers by a range from Start Customer # to End Customer #.
- Customers within this range can be excluded in the Excluded Customers section.
- Specified Customers: The red banner for excluded customers will become a green banner for INCLUDED CUSTOMERS.
- Manually enter or Search and select the customers to be included.
- Customer and Site will need to be selected for Separate A/R Site accounts.
- Customer Types: When selected, a Customer Type grid selection will open.
- Select all, multiple or single Customer Types to Include.
- Customers with a Customer Type that is not selected will be Excluded.
- Customers within a Customer Type selected can be Excluded in the Excluded Customers section.
All Billing Cycles are included by default. All bill cycles will be included unless specified otherwise. Type column indicates if the Billing Cycle is billed in advance or arrears.
- Select the Billing Cycles to Include or Exclude.
- The Bill Up To date can be changed manually, if needed.
TRUX will calculate all Miscellaneous Transactions unless specified otherwise.
- Select the Miscellaneous Transaction Codes to Include or Exclude.
- Surcharges are automatically Included and cannot be Excluded.
- Click Start Billing.
- Billing parameters will print. Verify the settings are correct.
- Confirm the message to continue to generate invoices.
- Billing Completion Information will print when billing has completed.
- Invoices Generated message with the Invoice range will appear on the screen. Click OK and you will be immediately directed to Print Invoices.
